Homemade Sprinkle Slice-and-Bake Cookies

If you love buttery homemade cookies with a little extra color, these Sprinkle Slice-and-Bake Cookies are a fun and easy treat to make. They’re filled with colorful rainbow sprinkles, have a delicate vanilla flavor, and bake up with lightly golden edges and a tender, crumbly center.
The best part is how convenient the dough is. You can mix everything together, roll it into logs, and keep it chilled until you’re ready to bake. Just slice, arrange on a baking sheet, and pop the cookies into the oven.
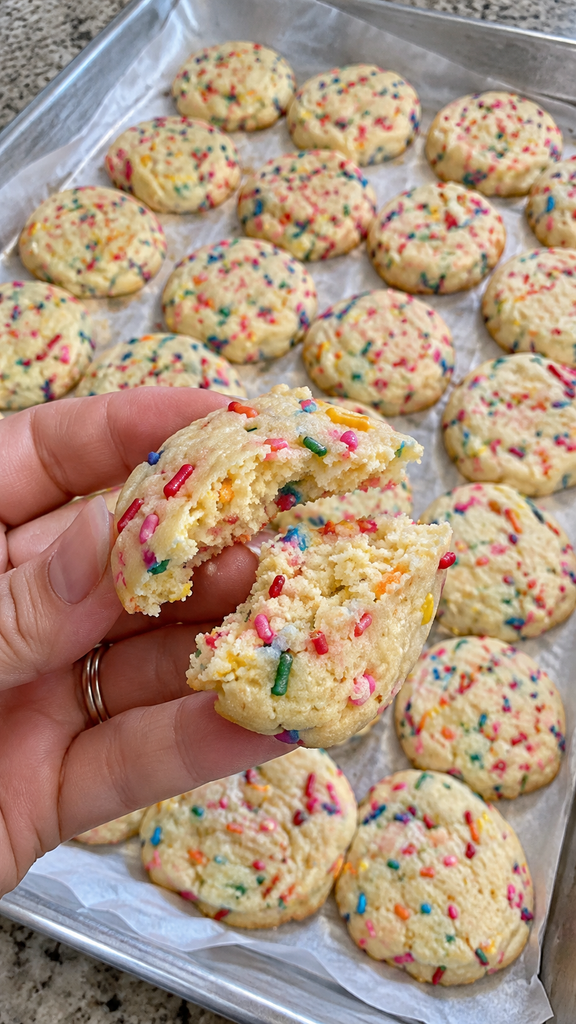
Ingredients You’ll Need
You only need six simple ingredients to make these homemade sprinkle cookies.
1. Unsalted Butter – 1 Cup (2 Sticks)
Softened unsalted butter creates the rich flavor and tender texture that make these cookies so good.
Use butter that is soft enough to cream with sugar but not melted. Melted butter can make the dough too loose and cause the cookies to spread.
2. Granulated Sugar – ¾ Cup
Granulated sugar adds sweetness and contributes to the cookies’ delicate texture.
3. Vanilla Extract – 1 Teaspoon
Vanilla gives these cookies their familiar homemade butter-cookie flavor. Pure vanilla extract works well, although regular vanilla flavoring can also be used.
4. All-Purpose Flour – 2 Cups (About 250 g)
All-purpose flour provides the structure needed to hold the cookie dough together.
For the most consistent results, weigh the flour when possible. If using measuring cups, spoon the flour into the cup and level it rather than packing it down.
5. Salt – ¼ Teaspoon
A little salt helps balance the sweetness and brings out the buttery vanilla flavor.
6. Rainbow Sprinkles – ½ to ¾ Cup
Rainbow jimmies work best because they generally hold their color and shape better than tiny nonpareil sprinkles when mixed into cookie dough.
Choose bright, colorful sprinkles for the classic homemade birthday-cookie appearance.
How to Make Sprinkle Slice-and-Bake Cookies
Making these cookies is straightforward. Follow these steps for tender, colorful cookies with lightly golden edges.
Step 1: Cream the Butter and Sugar
Place 1 cup of softened unsalted butter and ¾ cup of granulated sugar in a large mixing bowl.
Using a hand mixer or stand mixer, beat the butter and sugar together for about 2–3 minutes, until the mixture looks lighter and creamy.
Add the vanilla extract and mix until combined.
The butter should be soft, but it should not look melted or oily.
Step 2: Add the Dry Ingredients
In a separate bowl, stir together the flour and salt.
Gradually add the dry ingredients to the butter mixture, mixing on low speed until a soft dough forms.
Stop mixing as soon as the flour is incorporated.
Overmixing can develop too much gluten, making the finished cookies tougher than intended.
The dough should be soft and slightly firm, not wet or runny.
Step 3: Fold in the Rainbow Sprinkles
Add ½ to ¾ cup of rainbow sprinkles to the dough.
Using a rubber spatula, gently fold them in until they are evenly distributed.
Avoid mixing too aggressively because some sprinkle colors can bleed into the dough.
You want the finished dough to stay pale vanilla-colored with distinct colorful pieces throughout.
Step 4: Shape the Cookie Dough
Divide the dough into two equal portions.
Place each portion on a sheet of plastic wrap and roll it into a smooth, even log, approximately 1½–2 inches in diameter.
Wrap the logs tightly.
Try to keep their thickness consistent from end to end so the cookies bake evenly.
Step 5: Chill the Dough
Refrigerate the wrapped cookie dough logs for approximately 30–45 minutes, or until firm enough to slice cleanly.
This step helps the butter firm up and prevents the cookies from spreading too much while baking.
If the dough is still soft after 45 minutes, refrigerate it a little longer.
For more convenient baking, you can prepare the dough the day before and keep it refrigerated overnight.
Step 6: Slice the Cookies
Preheat your oven to 350°F (180°C).
Line a large baking sheet with parchment paper.
Remove the chilled dough logs from the refrigerator and unwrap them.
Using a sharp knife, slice the dough into rounds about ¼ inch thick.
Place the cookie rounds onto the prepared baking sheet, leaving about 1–2 inches between them.
If you prefer thicker, more tender cookies, cut slightly thicker slices and allow a little additional baking time.
Step 7: Bake Until Set
Bake the cookies for approximately 10–12 minutes, or until the edges are set and the bottoms are just beginning to turn lightly golden.
Thicker cookies may need a few additional minutes.
The tops should remain fairly pale. These are butter cookies, so they don’t need to become deeply golden to be finished.
Avoid overbaking because the cookies will continue to firm up as they cool.
Step 8: Cool and Enjoy
Remove the baking sheet from the oven and let the cookies rest on the pan for approximately 5 minutes.
Carefully transfer them to a wire cooling rack.
Once completely cooled, they’re ready to serve or store in an airtight container.
The cookies should have a delicate, slightly crisp edge and a tender, buttery center.
Tips for the Best Homemade Sprinkle Cookies
A few simple techniques can make a noticeable difference in how your cookies turn out.
Use Softened Butter, Not Melted Butter
Room-temperature butter creams more easily with sugar and helps produce a consistent dough.
If your butter is melted or overly warm, the cookies may spread more than expected.
Don’t Skip Chilling
Chilling the dough makes it easier to slice and helps the cookies maintain their round shape.
If the dough becomes too soft while you’re cutting it, return it to the refrigerator for another 10–15 minutes.
Choose the Right Sprinkles
Long rainbow jimmies are generally better for mixing into cookie dough than very small round sprinkles.
Some sprinkles can bleed when overmixed, so fold them into the dough gently.
Keep the Slices Even
Try to cut each round to approximately the same thickness.
Uneven slices can cause some cookies to become overly browned while others are still baking.
Don’t Overbake
These cookies should be pale on top with lightly golden bottoms.
Remove them once the edges are set. They’ll continue to firm up on the baking sheet as they cool.
Easy Recipe Variations
One of the nice things about this recipe is how easily you can change its appearance and flavor.
Birthday Cake Sprinkle Cookies
Use a generous amount of rainbow jimmies and add ¼ teaspoon of almond extract along with the vanilla for a bakery-style flavor.
Christmas Sprinkle Cookies
Replace the rainbow sprinkles with red, green, and white jimmies for a festive holiday cookie tray.
Valentine’s Day Cookies
Use pink, red, and white sprinkles for a simple Valentine’s Day treat.
Lemon Sprinkle Cookies
Add approximately 1 teaspoon of finely grated lemon zest to the dough for a light citrus flavor.
Chocolate-Dipped Sprinkle Cookies
After the cookies have cooled completely, dip one side into melted chocolate and allow it to set on parchment paper.
These variations let you use the same basic butter-cookie recipe throughout the year.
Common Mistakes to Avoid
Cookies Spread Too Much
If your cookies lose their shape in the oven, the butter may have been too warm, or the dough may not have chilled long enough.
Make sure the dough logs are firm before slicing and baking.
Cookies Are Too Dry
Dry cookies can result from using too much flour or baking them for too long.
Measure the flour carefully and check the cookies toward the beginning of the recommended baking time.
Sprinkles Bleed Into the Dough
Some types of sprinkles release color when exposed to moisture or excessive mixing.
Use rainbow jimmies and fold them into the dough gently.
Cookie Dough Crumbles While Slicing
Very cold dough can crack when cut.
If the logs have been refrigerated for several hours or frozen, allow them to soften slightly before slicing.
Use a sharp knife and rotate the log occasionally to help maintain its round shape.
How to Store Sprinkle Slice-and-Bake Cookies
These cookies are convenient because both the dough and the finished cookies can be stored for later.
Room Temperature
Allow the cookies to cool completely before placing them in an airtight container.
Store at room temperature for up to 5 days.
Keep them in a cool, dry location away from direct sunlight.
Refrigerating Cookie Dough
Wrapped, unbaked cookie dough logs can be refrigerated for up to 3 days.
When ready to bake, slice the dough while it is firm and follow the baking instructions.
Freezing Cookie Dough
For longer storage, wrap the cookie dough logs tightly in plastic wrap and place them inside a freezer-safe bag or container.
Freeze for up to 2 months for best quality.
Thaw the logs in the refrigerator until they are firm but easy to slice, then bake as directed.
Freezing Baked Cookies
You can also freeze fully baked and cooled cookies.
Arrange them in an airtight freezer-safe container, separating layers with parchment paper.
Freeze for up to 2 months for best quality and thaw at room temperature before serving.
What to Serve With Sprinkle Butter Cookies
These colorful cookies are delicious on their own, but they also pair nicely with everyday drinks and desserts.
Serve them with cold milk for a classic afternoon snack, or enjoy them with coffee or tea.
They also work well as part of a dessert platter alongside brownies, chocolate chip cookies, or other homemade treats.
For birthday celebrations, arrange the cookies on a large platter with a mixture of colorful sprinkles.
Because the cookies don’t require frosting, they’re also convenient for packing into cookie tins or gift boxes.
Frequently Asked Questions
Can I Make Sprinkle Slice-and-Bake Cookies Ahead of Time?
Yes. You can prepare the dough logs up to 3 days ahead and keep them refrigerated.
You can also freeze the logs for longer storage and slice them when you’re ready to bake.
Do I Have to Chill the Cookie Dough?
Chilling is strongly recommended.
It makes the logs easier to slice and helps the cookies maintain their shape while baking.
Skipping this step may cause the cookies to spread more.
Can I Use Nonpareil Sprinkles Instead of Jimmies?
You can, but small round nonpareils are more likely to bleed color into the dough.
Rainbow jimmies are the preferred choice for distinct colorful sprinkles throughout each cookie.
Why Are My Cookies Still Pale After Baking?
These butter cookies are meant to remain relatively pale.
Look for set edges and lightly golden bottoms instead of waiting for the tops to turn brown.
Can I Freeze the Cookies After Baking?
Yes. Cool them completely and store them in a freezer-safe airtight container for up to 2 months for best quality.
Thaw at room temperature before serving.
Can I Make These Cookies Without a Stand Mixer?
Absolutely.
A hand mixer works well for creaming the butter and sugar. You can also mix by hand with a sturdy spoon, although it will require more effort.
How Do I Keep the Cookies Round?
Roll the dough into even logs, chill until firm, and use a sharp knife to slice.
If one side becomes flattened while chilling, gently roll the wrapped log to reshape it before slicing.