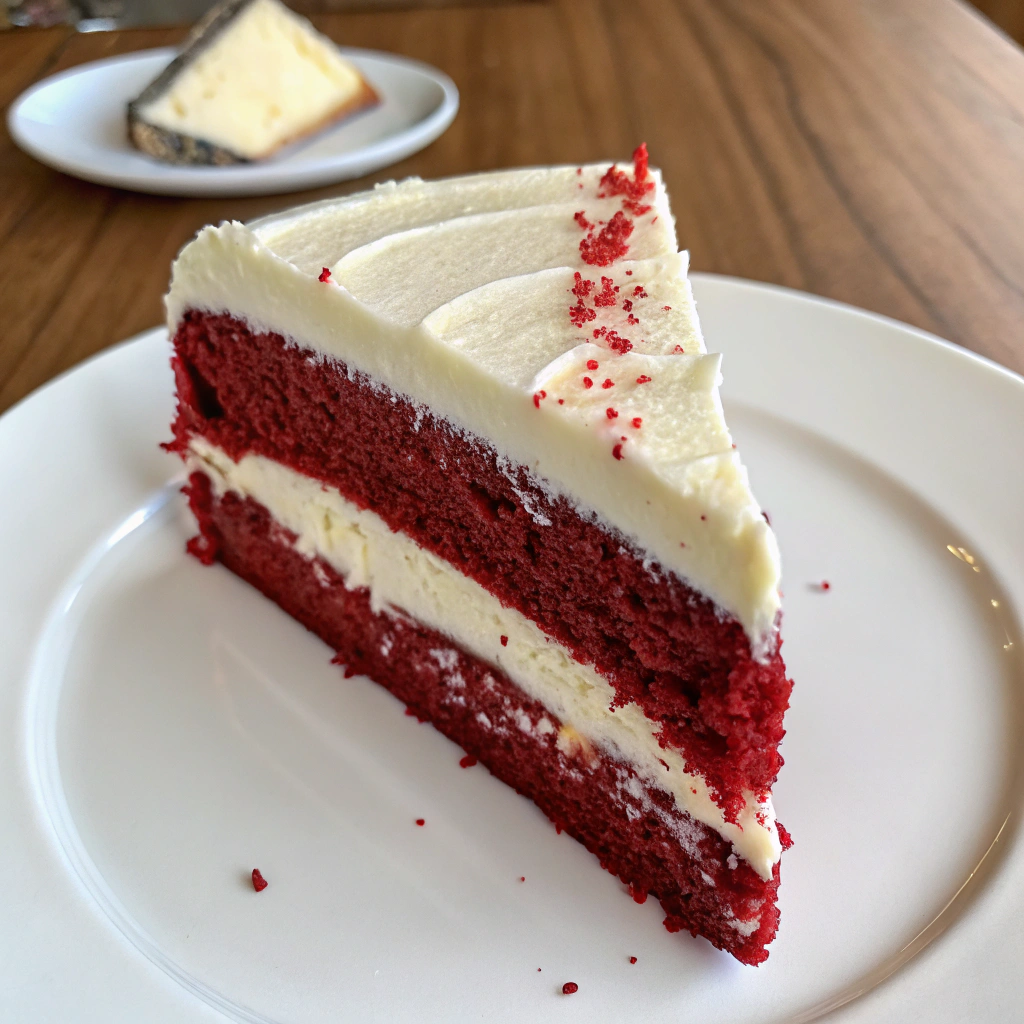
Red Velvet Cake
This red velvet cake is soft, moist, and just the right amount of chocolatey, with that classic deep red color and tender crumb. It’s made the traditional way with buttermilk, cocoa, and a touch of vinegar so you get the true red velvet flavor and texture. The cake is baked in a square pan, then sliced into four layers and filled and frosted with lightly sweetened whipped cream. It’s perfect for birthdays, holidays, or anytime you want a cake that looks as good as it tastes. Serve chilled or at cool room temperature and finish with cake crumbs on top for that pretty, bakery-style look.
Ingredients
- 1 ¾ cups cake flour
- 1 cup white sugar
- ½ cup vegetable oil
- ¾ cup buttermilk
- 2 eggs
- 1 ½ tablespoons cocoa powder
- 1 tablespoon gel red food colouring
- 1 teaspoon bicarbonate of soda (baking soda)
- 2 teaspoons vanilla essence (vanilla extract)
- 1 teaspoon white vinegar
- ½ teaspoon salt
For the cream topping:
- ½ cup cold heavy or whipping cream
- 3 tablespoons icing sugar (powdered sugar)
- 1 teaspoon vanilla essence (vanilla extract)
Directions
- Preheat the oven to 325°F and line an 8-inch square cake pan with parchment paper; grease the sides and parchment lightly with butter or oil.
- In a large bowl, mix together the sugar and vegetable oil until well combined, then add the vanilla and eggs and beat until smooth.
- Pour in the buttermilk and mix, then add the red food colouring and stir until the color is evenly distributed.
- Sift the cake flour, bicarbonate of soda, cocoa powder, and salt into the bowl, then gently mix just until all the dry ingredients are incorporated and the batter is smooth.
- Add the white vinegar and gently mix it through the batter. Pour the batter into the prepared pan, smoothing the top.
- Bake for about 45–50 minutes, or until a toothpick inserted in the center comes out clean. Let the cake cool completely in the pan.
- Once cool, remove the cake from the pan. Trim off the domed top and edges to level the cake; save the trimmings for crumbs. Slice the cake in half horizontally, then cut each half in two to create 4 equal layers.
- To make the cream topping, add the cold heavy cream, icing sugar, and vanilla to a large chilled bowl and beat with a mixer until thick and spreadable.
- Stack the cake layers, spreading whipped cream between each layer, then frost the top and sides with the remaining cream.
- Crumble the reserved cake trimmings and sprinkle the crumbs over the top (and sides if you like) for decoration. Keep the cake refrigerated until ready to serve.
Prep Time: 30 minutes | Cooking Time: 50 minutes | Total Time: 100 minutes
Kcal: 380 kcal | Servings: 9
Tips
Use room-temperature eggs and buttermilk and make sure to sift the dry ingredients so the batter mixes evenly—this helps the cake bake up soft and smooth without tunnels.
Let the cake cool completely before slicing into layers and frosting, and store it covered in the refrigerator; red velvet tastes great chilled and holds its shape better when cold.
FAQ
Why do I need both buttermilk and vinegar in red velvet cake?
They work together with the baking soda and cocoa to create the classic texture and subtle tang that makes red velvet different from plain chocolate cake.
Can I use liquid food coloring instead of gel?
You can, but you may need more to get a strong red color; be careful not to thin the batter too much, and always use food coloring made for baking.
Can I use all-purpose flour instead of cake flour?
Cake flour gives a softer crumb, but if you only have all-purpose, you can use it—just know the texture may be slightly less tender.
Can I frost this with cream cheese instead of whipped cream?
Yes, a cream cheese frosting is also a classic choice for red velvet; just swap the whipped cream for your favorite cream cheese frosting recipe.
How far ahead can I make this cake?
You can bake the cake a day ahead, wrap it well once cool, and assemble and frost it the next day; fully frosted, it keeps well in the fridge for about 3 days.